
Meal Planning, Recipes & Food Inventory
Feeding a patrol for a weekend takes planning. MySummitKeep gives you three connected tools for that: Meal Plans for building a menu day-by-day, the Recipes library you draw from, and Food Inventory for tracking what your unit already has on the shelf. This guide walks through each, in the order you would normally use them.
Creating a meal plan (from scratch, template, or AI)
Section titled “Creating a meal plan (from scratch, template, or AI)”Open Meal Plans from the sidebar to land on the plan list. Your saved plans live under the My Meal Plans tab; reusable starting points live under Templates. You can search by name and filter by trip type (Campout, Day Hike, Summer Camp, and so on).
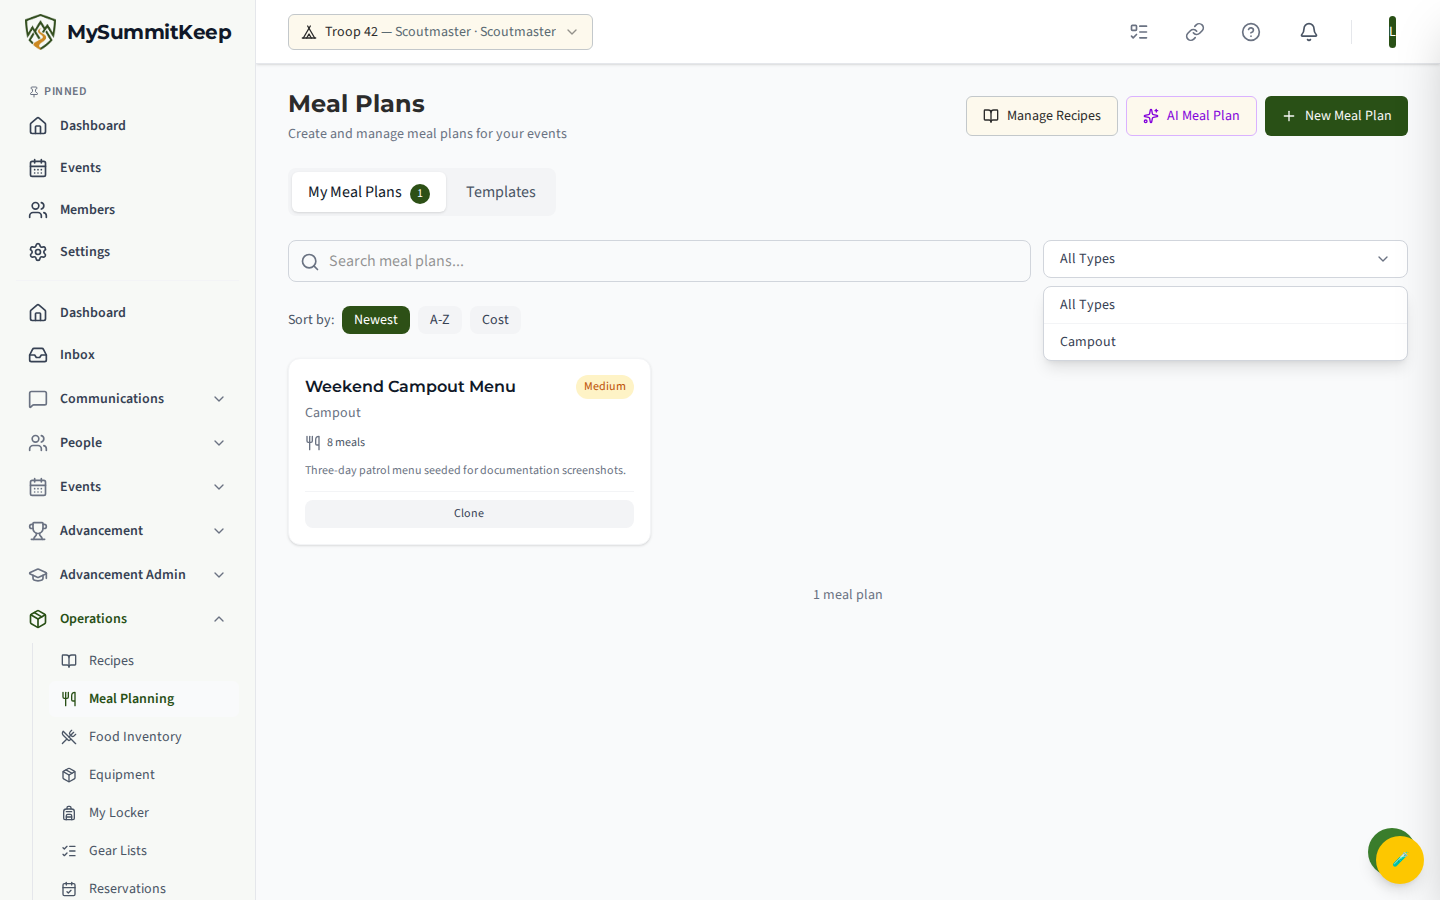
There are three ways to start a plan:
- New Meal Plan — opens a blank builder. Give it a Name, Description, Type, and Difficulty, set the number of Days, and an estimated cost. Tick Save as Template if you want to reuse it later. The Meal Grid gives you a Breakfast / Lunch / Dinner / Snack slot for each day; click a slot to pick a recipe and set servings.
- From a template — switch to the Templates tab and use a ready-made plan. This clones it into your own list so you can edit freely without changing the original.
- AI Meal Plan — click the purple AI Meal Plan button. Tell it the number of days, number of people, cooking method (Campfire, Dutch Oven, Camp Stove, Grill, or No Cook), an optional per-person budget, plus any dietary restrictions and allergies. The AI returns a full day-by-day menu with ingredients and instructions. You can Import any suggested meal straight into a new recipe.
Nutrition and allergen analysis
Section titled “Nutrition and allergen analysis”Open any saved plan to see its Meals by day breakdown. Each linked ingredient expands to show per-serving nutrition — calories, protein, carbs, fat, sodium, sugar, and fiber — along with any allergens carried by that item.
Individual recipes carry their own breakdown. A recipe’s detail page shows a Nutrition (per serving) panel (calories, protein, carbs, fat, and fiber) alongside its Allergens panel, and you choose allergens (Peanuts, Tree Nuts, Milk, Eggs, Wheat, Soy, Fish, Shellfish, Sesame) when you create or edit a recipe. Because this data rolls up from linked ingredients into plans, the more complete your recipes are, the more useful the plan-level totals become.
Generating a shopping list
Section titled “Generating a shopping list”From a meal plan’s detail view, click Generate Shopping List. Items are grouped by category with a running checked-off count, an estimated total cost, and an allergen warning icon on any line that carries one.
You can refine the list before you shop:
- Search & Add Item — type a grocery name to search live products (powered by MealMe) and add one with its price.
- Add Custom Item — enter anything by name, quantity, and unit.
- Export as PDF or Export as CSV, or use the printer icon to print.
The recipe library and URL import
Section titled “The recipe library and URL import”The Recipes page is your library. Three tabs separate System Recipes (built-in), Community (shared by other units), and My Recipes (your unit’s own). Search, filter in the sidebar, and switch between grid and list views.
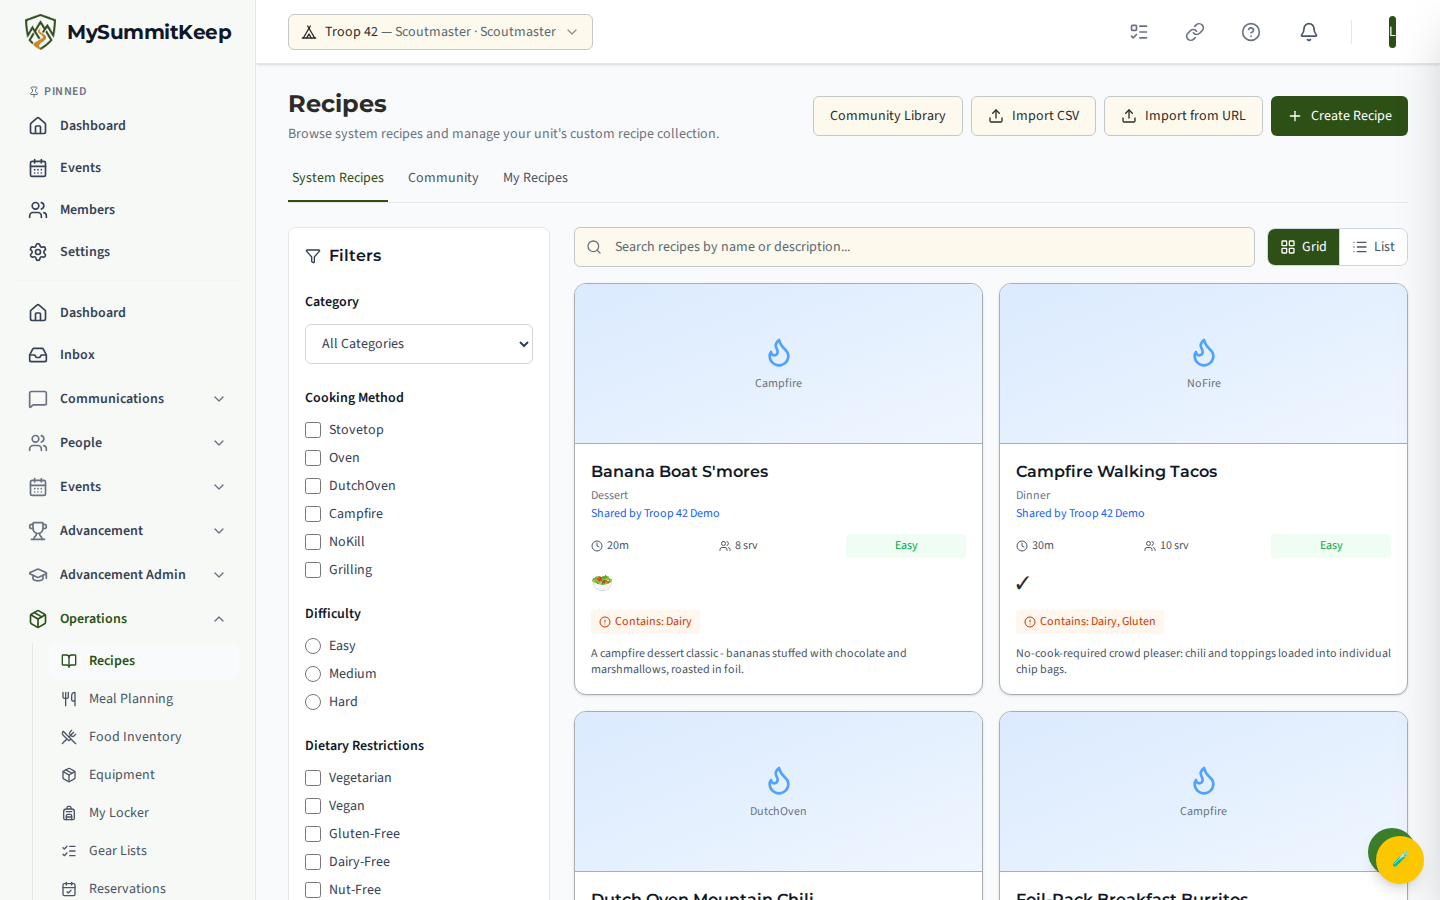
Leaders get extra buttons in the header: Create Recipe, Import CSV, and Import from URL. The URL importer is the fastest way to grow your library — paste a link from AllRecipes, Food Network, or most recipe sites and the AI extracts the recipe for you. By default an imported recipe is submitted to the community library for review; tick Keep this recipe private if you would rather not share it.
Publishing and using Community Recipes
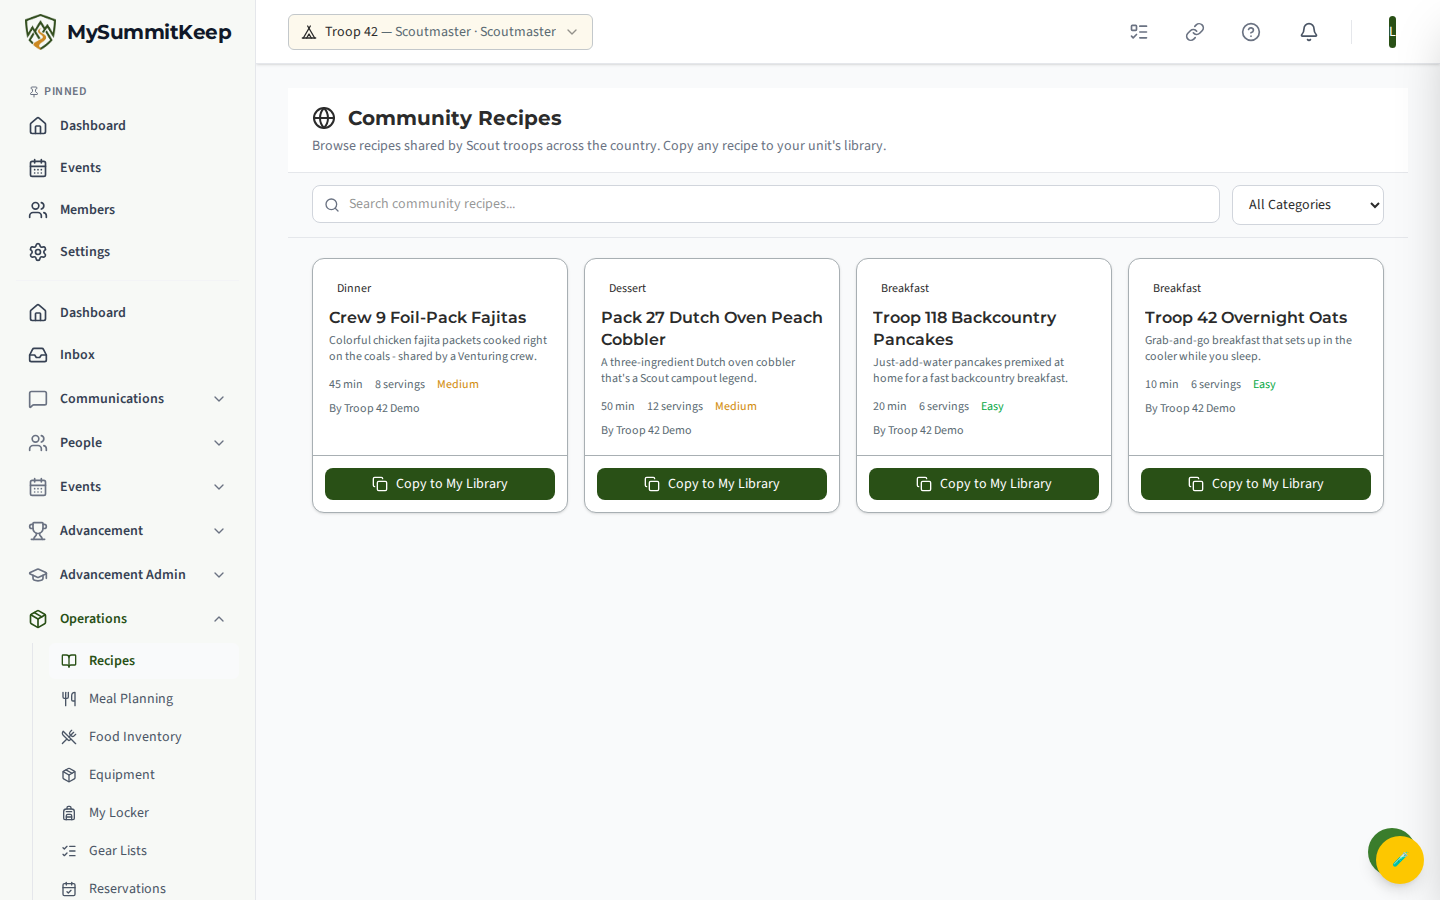
Section titled “Publishing and using Community Recipes”Any recipe your unit owns can be shared. On a recipe’s detail page, click Publish to Community — once approved, other units can discover and copy it. Use Make Private to pull it back.
To browse what others have shared, open Community Library (the /recipes/community page). Search by name, filter by category, and click Copy to My Library on any card to add it to your own recipes, ready to drop into a meal plan.
Tracking food inventory and expiring-soon items
Section titled “Tracking food inventory and expiring-soon items”The Food Inventory page tracks what your unit physically has. Summary cards across the top count Total, Available, Expiring Soon, Expired, Reserved, Used, and Donated items, and an alert banner highlights anything expiring within 7 days.
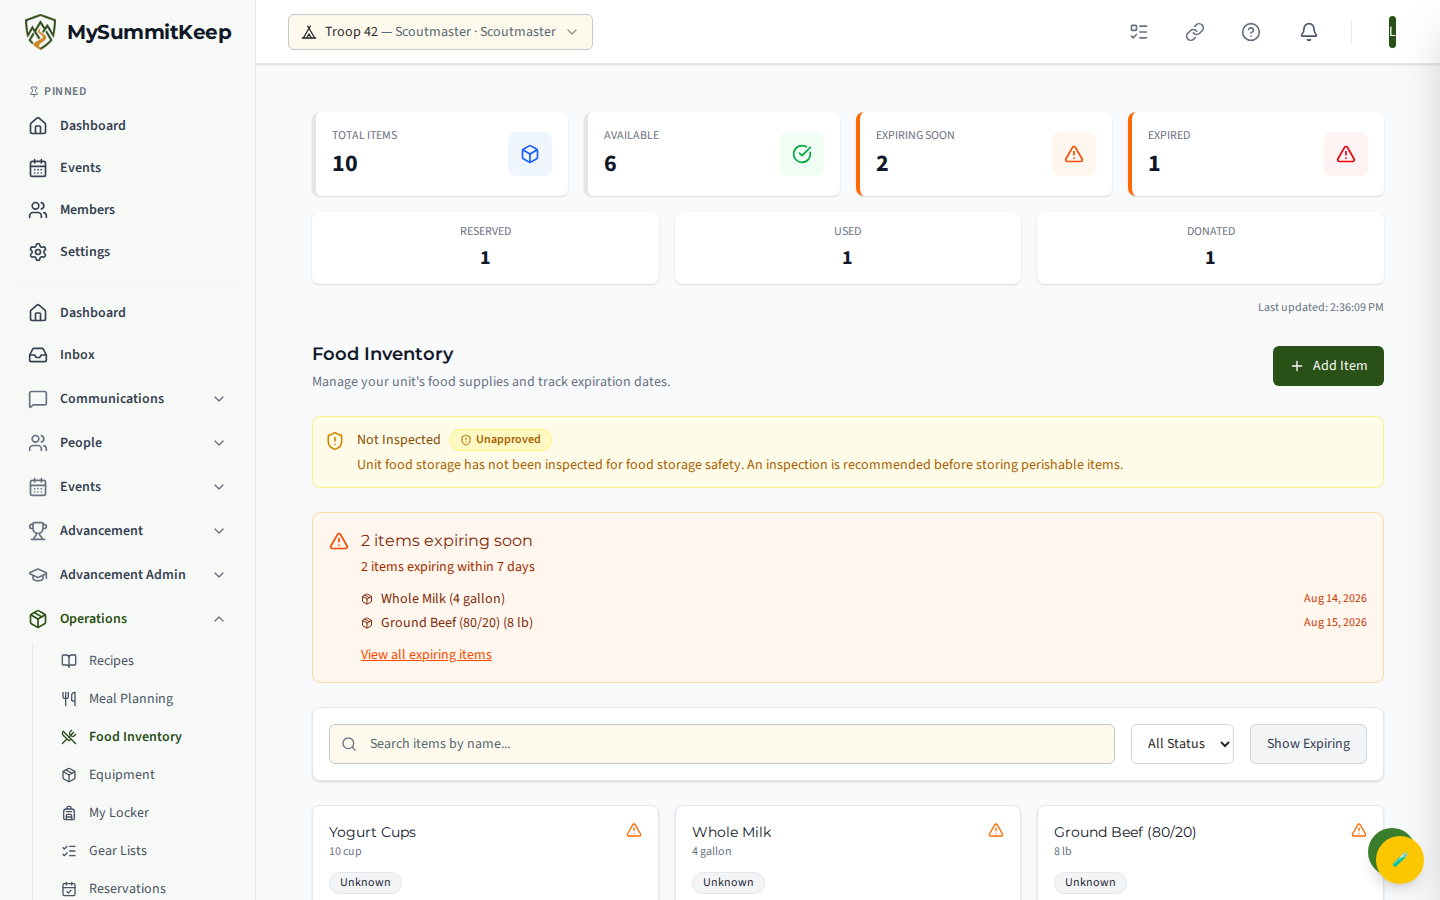
Use Add Item to record a food item with its ingredient, quantity and unit, status, expiration date, an optional barcode (UPC/QR), notes, and a Storage Location. Search by name, filter by status, or flip on Show Expiring to focus on what needs using up first. (The Add Item, Edit, and Delete controls only appear if your role carries the matching food-inventory permission.)
Organizing inventory by patrol box
Section titled “Organizing inventory by patrol box”The Storage Location field links each item to a Patrol Box, so you can see exactly what is stocked in each box. (Set up boxes first on the Patrol Boxes page; if none exist yet, the dropdown will tell you.) Each item card shows its patrol box and, when an expiration date is set, an orange warning triangle once the item is expiring soon or already expired.
As food gets used, keep the counts honest by opening Edit on an item card and changing its Status — set it to Used when it has been eaten, Expired when it has spoiled or passed its date, or Reserved/Donated as needed. Adjust the Quantity in the same form to reflect what is left. Items marked anything other than Available stop counting toward the Available card and move to the matching summary count.
Keeping inventory current means your next AI meal plan and shopping list reflect what you actually have, instead of buying duplicates. For organizing the boxes themselves, see Patrol Boxes.